Milk Street Magazine

img_5597.jpg

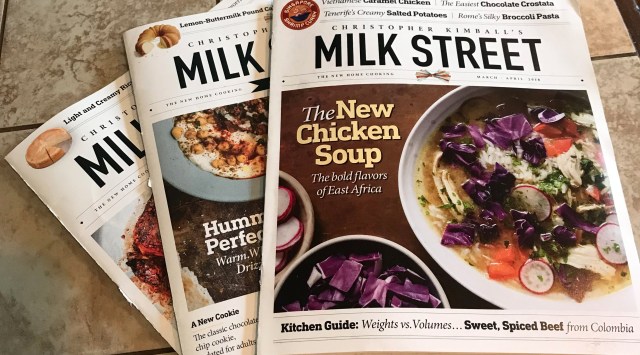
This magazine is filled with fantastic recipes. They are interesting. They are easy. And they are delicious. We’ve made the Japanese fried chicken, the Broccoli pasta (you make a sauce from the stems!) and countless others. We’ve have not been disappointed yet.

There is a fair amount of controversy around it’s production. Christopher Kimball left America’s Test Kitchen before his contract was up and is embroiled in some lawsuits because of it. But, hey, who’s to say we can’t enjoy some great recipes in the meantime?

There are also lots of interesting articles from different parts of the world.

And did I mention delicious recipes?

So many delicious recipes.

Advertisement
Posted in My Favorite Things | Tagged , , , , , | Leave a comment

Monsieur Mirepoix


pexels-photo-532902.jpegSo I mentioned in my post Bulgur: The Epically Delicious Grain that Mirepoix, the mixture of chopped onions, celery and carrot used as a base for French soups and sauces, had an interesting history.

First off, I should mention that a lot of cultures have their own versions of a soup/sauce base, depending on what vegetables are regionally available.  In Germany, for example, it is called suppengrün which literally means ‘soup greens’ and consists of a leek, a carrot and a piece of celeriac.

What’s particular about Mirepoix is the name.  As in it is an actual name of a person, not a term to describe what it is in essence.  He was a French Aristocrat with so many names that I chose to copy and paste it rather than type it out.  Let’s be real, I have a baby sleeping on one arm… Charles-Pierre-Gaston François de Lévis, duc de Lévis-Mirepoix. Holy Aristocracy that’s a lot of names!  I don’t feel so bad about my kids’ names, now.

Even better, he isn’t the one who actually invented or used a mirepoix. I don’t know what French Aristocrats did with their time; hunt? contemplate cheese? powder their wigs? But I do know it wasn’t cooking. His chef did that. Whose name is lost to history while Mirepoix is too cemented to the vegetable base for it to make any difference at this point.

So there’s history for you; in spite of being described as an ‘incompetent and mediocre individual‘ Mirepoix has become the pathway and maybe even the gate guard to delicious soups and sauces. Go figure.


Posted in Kitchen History, Soups | 1 Comment

Snacking Chocolate

How is it 2017 and chocolate is only now being recognized as an official snack item? This is ridiculous. I’ve known since the first time I tasted it. I am, of course, speaking of Barkthins.

IMG_5588

Is this bag empty? Is it any of your business? All I know is that that Barkthins told me I was sophisticated and even mindful for eating them. So there. I was REALLY sophisticated and mindful this week. SO much so that I’ll need to be placing another order on Amazon soon.

I personally love the pumpkin seed flavor and the almond flavor. But there are others to try. It’s good to have things to look forward to.

Enjoy!

Posted in My Favorite Things | Leave a comment

Bulgur: The Epically Delicious Grain

pexels-photo-265242.jpegYou have met bulgur before.  It was probably dressed in Tabouli.  But it’s got a lot more to offer – after 4000 years of being cultivated – it’s been around the block.  Bulgur means “bruised grain” and it has to do with the way it is processed.  The wheat is boiled or parboiled, dried out in the sun (at least traditionally) and then smashed into bits and stored for later use.  Maybe it was an ancient method for dealing with anger?  Who knows?  In any event, they are delicious little nuggets that absorb flavors like little champs or taste delicious with just a little olive oil and salt.  Bulgur can be used as a side dish, a breakfast cereal, it can replace pasta in soups, rice in stir frys, and the list goes on. Bulgar is basically my hero.

But before we get to the good stuff – Confetti Bulgur I like to call it,

“HI!”

It’s been a while – like FIVE YEARS (!) since I posted last. I’ve been a little busy – had two more kids, for a grand total of three – which means that our whole house looks like the header image on this blog and there isn’t as much time for testing recipes and taking pretty pictures. That’s not to say that I haven’t done it. I like taking pictures of food. It’s like a yummy memory. I’ll have to go back and find those and recreate them. Anyhow, that’s where I’ve been in a nutshell, or I guess I WAS the nutshell and they were the nuts…which makes a lot of sense as an analogy…..

Back to bulgur. We’ve been making bulgur for years now, but I can’t recall exactly when we realized the importance of incorporating it into our life. Even just now, we reheated the recipe I’m about to share and threw an over easy egg on top. Et Voila!: Delicious and filling breakfast. My husband loves to eat plain bulgur with over easy eggs and turmuric sprinkled on top.

After many iterations – I think my husband came up with the exact ratio of water to bulgur that resulted in fluffy, perfectly cooked bulgur.  But the truth is it’s pretty hard to mess it up.

What you need: 2 cups water or broth (I frequently use chicken bouillion for this) and 1 and 1/3 cups bulgur. Put a tablespoon or two of olive in a pot on the stove and put on medium high heat. Saute bulgur grains in olive oil and a pinch or two of salt. Once everything is coated nicely in oil, add the liquid (carefully, it bubbles up) and bring to boil. Then turn to a simmer and cover. Cook for about ten minutes. The liquid should be all absorbed with little steam holes when done: IMG_5571

If you use a little less oil and saute the grains a bit longer, stirring occasionally, you can achieve a nice toasty flavor, too. It’s good to have options.

Confetti Bulgur:

confetti bulgur

What you need:

1 recipe for regular bulgur (you will likely have some leftover, but it’s up to you how much you add)

1/2  to a whole onion

2 carrots

2 ribs of celery

1/2 bell pepper (color’s up to you!)

If you’ve spent some time cooking, you’ll recognize the above as the makings of a mirepoix, used as a base traditionally for soups or sauces. Mirepoix is kind of interesting in itself, but I’ll go more into that in a separate post. It’s meant to be gently sauteed.

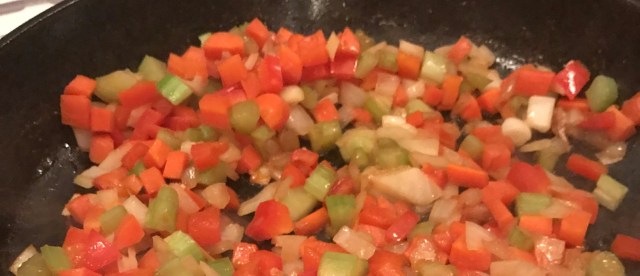
If you are keeping this a side dish, you basically just saute the veggies in olive oil until tender, toss in as much bulgur as you please, salt and pepper to taste, and you’re done!

confetti bulgur

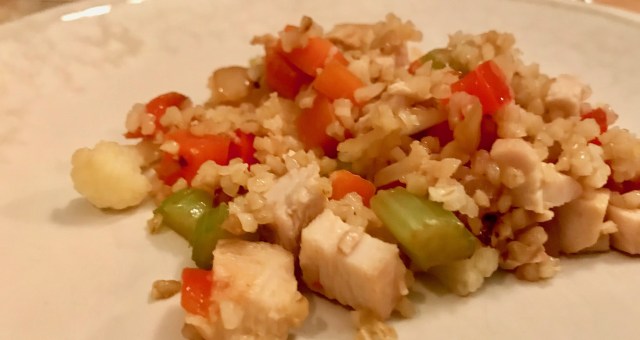
This is also a great place to toss in any leftover tidbits of meat or other veggies from your fridge. In this case I had leftover chicken and cauliflower which I tossed in last. This was enough to take this baby from side dish to main dish – and then main dish in the morning again with the addition of over easy eggs. I like a meal that does that much work.

Enjoy!

It’s good to be back.


Posted in grains, recipes, Rice, Side dishes | Tagged , , , , , , , , , , | 1 Comment

Soaked Whole Wheat Tortillas

IMG_9790Oh, man. Hi there! It’s been a while! Turns out having a child takes up a lot of TIME…who knew??

But I had to eke out just a minute here to share this go-to tortilla recipe, because if you haven’t looked at the back of your store bought tortilla package today, you’ll need to get yourself a magnifying glass and a half an hour just to read the ingredients – and that’s the ones from the health food store!

Needless to say, with a focus on simple and wholesome foods, there isn’t really a place for store bought tortillas. Enter the soaked whole wheat tortilla. I have to give most of the credit for this recipe to MAM (Modern Alternative Mama) a place to find lots of good and healthful recipes.

However, I did tweak the recipe enough to feel that it warranted it’s own post. I just went with a whole wheat flour, as opposed to white whole wheat, but it’s what I had. And I have found the whole wheat flour to have a slightly richer flavor that I appreciate. I reduced the amount of salt, increased the coconut oil and water both, because I didn’t want to work as hard as she described rolling out a really stiff dough (read: I’m lazy, and I’m ok with that).

So, enough blabber-jab, time’s a tickin’! On to the recipe:

3 and 1/3 cups whole wheat flour

1 and 1/2 cup water

1/2 cup coconut oil (melted)

After soaking overnight, you will add:

3 teaspoons baking powder

1-2 teaspoons salt (I stick with one, but this is really up to your taste buds)

The night before you think you will have time to roll out a bunch of dough and fry it up (and sometimes you are wrong, especially when you have kids, but that’s ok, I’ve left the wet dough, covered, up to a couple days..just makes it richer tasting, right??): melt your coconut oil and mix with flour and water until it all comes together (this may require a little hand kneading). Cover with plastic wrap and let sit out on the counter, or wherever you have room, over night. Soaking helps to make the flour and its nutrients more accessible to your body and I’ve read, both on the MAM site, and other places that whole wheat flour doesn’t necessarily require an additional acid to help break it down – if you are really passionate about soaking grains, I’m sure you could add some lemon juice, whey or keiffer to help it along, but you may taste it in your tortilla. I haven’t tried it!

When it comes time to add the salt and baking powder, this is another place I diverge from MAM. Instead of trying to stab the hard dough into chunks with a metal spoon, and then somehow mix the salt and baking powder into it (and hey, don’t get me wrong, if you are feeling angry this can be a very effective release), I mix the two dry ingredients into a little bowl. I sprinkle a little of the mixture onto the surface I am going to knead on, place the dough on top and then sprinkle a little on top of the dough as well. While I am kneading, I keep sprinkling it until it’s all gone. This saves me from adding too much flour, as I think keeping it a little on the moist side helps when you are rolling it out.

When you are ready to roll out the tortillas, grab your rolling pin. Also, start pre-heating your pan on medium heat. I use a cast iron and just rub the tiniest bit of coconut oil on there with a paper towel, you just want it to shine, no pooling! MAM makes 8 tortillas, but I find if I only make 8 they are literally gone in a day. So in order to pace my family, I split the dough into 16ths. My highly precise method can be observe below. (We remember that my kitchen nickname is rough-chop, right?? I know, it’s been a while..)IMG_9795Ok, so leave the odd shaped pieces you’ve cut, but aren’t rolling yet in the bowl, and grab one of this little pointy chunks and roll it into a small ball. I’ve found the more orb-like this ball is, the better off your tortilla will be. But don’t get any ideas of perfection. At least, not if you want to don’t want drive yourself crazy. Remember that machines are what make the store bought, and you are not a machine! 🙂

Come on, baby, ROLL me!

Come on, baby, ROLL me!

Ok, and here’s where things really start to get rollin’ (I couldn’t resist). I sprinkle the tiniest but of flour onto the ball, but leave it tacky, as that is how you are going to get these babies FLAT. As I roll, and you DO have to use a little pressure – consider it your weight-lifting routine – I flip the tortilla over and back a few times, so it doesn’t get too ground into the cutting board.

Once it’s as flat as you can get it, or as flat as you have time/motivation for, throw that baby in the pan! Cook for a minute or so on each side, you want the bubbles to pop up and some light browning to be happening. IMG_9791This one looks like an old lady with a pointy nose on a motorcycle, with her hair flying back, do you see it?? Like I was saying, perfection is not the goal here, people, yum-yums are!

Let the hot tortillas cool on a rack. When they are totally cooled, I split them into two large baggies and freeze some, when I pretend that it will take that long before we eat them.

You can eat just about anything with a tortilla, and my little one usually demands the first one that I’ve made, once it cools a bit.

Happy Tortilla making, and may you never buy store-tortillas again!

Posted in Bread, grains, recipes | 2 Comments

Cauliflower, a vegetable cinderella story…

I’m sad. Nobody loves me.

Once upon a time there was a sad little bunch of florets. Overcooked and generally doused in a heavy cheese sauce, it’s true inner beauty and flavor went unappreciated by those around it. Until one day, a recipe came along that knew JUST how to treat this yummy vegetable and it was brought forth from the shadows. Soon after it was discovered that this lovely cabbage flower was a member of the Royal Brassica Oleracea family, it’s family included broccoli, brussel sprouts, kale, collard greens, and cabbage. (Ok, I made up the ‘Royal’ part…)

Quick note: I don’t have a problem with a good cheese sauce. However, if you haven’t tried just chopping up a head of cauliflower into even bite-sized bits, sprinkling with a little olive oil and salt and then broiling it until it caramelizes, you seriously don’t know what you are missing. It’s like BUDDA, baby.

Cauliflower has a lot to offer in addition to it’s lovely flavor, when cooked correctly. It is considered a nutrient dense food because it is low in fat, but high in fiber, folate, and vitamin C, in addition to several phytonutrients that are believed to help protect against cancer and aid in DNA repair. So get ready to get your cauliflower on!

This recipe was initially inspired by a recipe in a magazine that turned out to be more like an evil step-sister. The picture looked really pretty, but when I started to read the directions, like just boiling the cauliflower in water forever (ick, overcooked, taking away nutrients AND flavor) and also didn’t call for the entire head of cauliflower (what am I supposed to do with the rest?) Not that I couldn’t find something to do with it, but if I’m going to make a soup, I’d just rather use the whole cauliflower, you know? So, pretty on the outside, ugly on the inside, this an evil step-sister makes.

I kept a few things, like, the cauliflower, the coconut milk and the curry spices. The rest is just soup-making basics. So let’s get to it.

Ingredients:

Olive oil

2 cloves of garlic

1 tablespoon ginger

1 whole onion (I went with a yellow, or a sweet would be nice here, too)

3 cups chicken stock

whole head of cauliflower, chopped into even almost bite-sized pieces

1 and 1/2 tablespoons curry powder

1 and 1/2 cups coconut milk

salt and pepper to taste

2-3 tablespoons parsley (more if you are really into it)

The other nice thing about this recipe is that it’s fairly simple. I like simple. And so does cauliflower. It doesn’t take a lot to make it taste good.

Chop your onion and throw it in your warmed soup pot with some olive oil and saute until just soft. While the onion is softening, chop your garlic and your ginger. When the onion is ready, toss in your garlic and ginger and saute until you can just smell them, maybe a minute or so. Then throw in your three cups of stock.

Chop up your head of cauliflower. I find it is easier to start by removing the stalk so you get the pesky green leaves out of the way. They are a little tough and hard to get around. Then you can set your cauliflower head flat side down on the cutting board and get to business. Add this to the pot, along with the curry powder.

like fluffy little clouds, in a chicken stock sky..

Bring to a boil, then simmer for about ten minutes, or until the cauliflower is tender.

While the soup is simmering away, get out your coconut milk. You’ll want to give it a stir since it separates in the can. You could also take this moment to chop up your parsley.

I’m so fresh and so green!

And may I just take a moment, since the soup is still boiling, to elaborate on the wonderful world of parsley? It has also been found to have anti-cancer benefits by inhibiting the formation of blood vessels that feed a tumor, helps to excrete sodium while increasing the absorption of potassium, is antimicrobial and is also a rich source of phytochemicals, like carotenoids, which are antioxidant and anti-inflammatory. Ok, done.

That soup is probably about ready! Pour in your mixed up coconut milk and get ready to blend.

The next step, for me, includes an immersion blender. I had an ‘incident’ with a regular blender and hot soup a couple years ago, and I just don’t go there anymore. But if that’s what you’ve got, just proceed with caution and in SMALL batches. Don’t let impatience get the best of you. Believe you me!

Blend, baby, blend..

Once you have achieved the desired consistency, add your salt and pepper to your own liking and serve it up. If you desire a little more curry punch here, don’t be afraid to add a little more. Soup is good that way. It takes to tweaking pretty well.

A nice dappling of green to finish it off!

Sprinkle on your parsley and “Mangia, mangia, mangia!”

This soup has a delicate sweetness to it with a satisfying and rich finish. It would probably be delicious hot or cold..although we didn’t have enough left over to test out the cold hypothesis…oops! Maybe next time.

Enjoy!

Posted in recipes, Side dishes, Soups, vegetables | 1 Comment

14 Carrot Cake Gold

…mmmm carrots…

I love carrots just as much as the next person. They are particularly delightful to dip into hummus, along with fresh bell peppers. However, I would say hands down my favorite way to load up on all the beta carotene, fiber, antioxidants and minerals in these crunchy taproots would be via the delicious vehicle that IS carrot cake. And what’s all the better is that a cooked carrot provides more of these nutrients than an uncooked carrot. So really, you’re just bringing out the best in this yummy veggie. And who could fault you for that?

This recipes is particularly delicious because it’s filled with carrot, dried apricots, and pistachios and you could probably leave it out for several days and it would not become dry. We sort of tried this by default. This may sound disturbing at first, but really it’s a function of the olive oil content..which is ALSO good for you. So this is BASICALLY a health food snack…at least, until you add the frosting..but who’s counting? In moments like these I like to think of Mitch Hedberg‘s great joke about an onion ring and a carrot – he said he wished when they both got into his stomach the carrot could say “It’s cool, he’s with me.” So, we’ll just let the carrots do the talking for the frosting and call it good.

So, onto the ingredients:

Cake:

3 cups AP flour

1 and 1/2 cups sugar

1/2 cup brown sugar (I used light brown)

1 tablespoon baking soda

2 teaspoons baking powder

1 and 1/2 teaspoons salt

1 and 1/2 or 2 teaspoons cinnamon (use 2 if you like a little spice in your carrot cake)

1 teaspoon or 1 and 1/2 tsp freshly grated nutmeg (probably just the one if its not fresh)

1/2 teaspoon allspice

3 cups grated carrots

1 and 1/2 cups chopped dried apricots

1 and 1/2 cups chopped pistachios (you’ll need a little extra set aside time for this part, unless you can find the magical fountain of unshelled pistachios…)

4 large eggs

1 and 1/2 cup olive oil

1/2 cup milk

2 tablespoons vanilla extract

Frosting:

4 cups powdered sugar

2 x 8 ounce packs of cream cheese, room temperature

1/2 cup unsalted butter

4 teaspoons vanilla extract

1 tablespoon lemon zest

1 tablespoon lemon juice (optional, if you like a tangy cream cheese frosting)

Geez. I just have to say right now that it’s been a couple months since I made this fine cake, and even though I JUST made a batch of Orangette’s AMAZING whole wheat chocolate chip cookies, I am thinking of giving them all away so I can make this one again. My mouth is literally watering.

Ok, now that I got that off my chest, and now that you are familiar with the long list of cake ingredients (I promise it’s WORTH it) I realize I forgot to tell you the bonus to this recipe…there is enough for 8-12 cupcakes in addition to the two layers of cake. So you know when you bake a cake and you really want to try it, but you can’t break into it until you bring it to whomever? Well, fear not, my friend, because you can guiltlessly gobble down your own private carrot cake party, experimenting with butter spreads (yummy!) and maybe a dip or two into that cream cheese frosting. Because, you know, you HAVE to make sure it isn’t poisonous, right?

little blank canvases…

Ok, ok, it’s been a while, so I’m blabbing, let’s get to the baking!

Preheat your oven to 350 degrees F. Butter or spray two 8-inch round cake pans and an 8 or 12 cup muffin pan (you’ll have to keep an eye on the littler ones while baking) and set them aside.

If you are using fresh nutmeg, now would be a good time to grind it down. Like I said with the cinnamon, and especially because fresh nutmeg has a more delicate aroma than pre-ground nutmeg, don’t be afraid to sprinkle a little extra in there!

such a yummy little nut..

Next, combine the flour, sugars, baking soda, baking powder, salt, cinnamon, nutmeg, and allspice in a large bowl. The note about the cinnamon is just that I, personally, like a little spiciness to my carrot cake and for some reason the 1 and 1/2 teaspoons didn’t seem like enough, the cinnamon-iness was more subtle than I prefer, so up the ante if you’re like me. If you like it more mild, just follow the main recipe. Whisk the dry ingredients to combine.

it’s like an abstract painting…I’m feelin’ it..

Next, you’ll want to chop up your pistachios and dried apricots and grate your carrot any way you please. I like the bigger, traditional flakes, so you get a nice little burst of carrot flavor. Toss all these into the flour mixture and mix them up, making sure the little bits of apricot get a nice coating of flour so they don’t end up in a big clump.

coat ’em up!

Grab a medium bowl and add the four eggs, olive oil, milk and vanilla and whisk until combined.

it’s like moisturizer for your cake!

Add the wet ingredients to the large bowl of dry and stir until just combined.

a sea of gooey deliciousness…

Now you are ready to distribute the batter, 3 cups into each cake pan and about 1/4 cup per muffin tin. Mostly you want to make sure the muffins look even, whether you decide to eyeball it or go with the measuring cup.

Bake the cakes until you can poke ’em with a toothpick and have it come out clean. This is about 40 minutes for the cakes and 20 minutes for the cupcakes. Cool cakes in the pans on a wire rack for 20 minutes. If you are planning to move directly to the frosting, it’s probably a good idea to take the cream cheese out of the fridge when you pull the cakes from the oven, so it can reach room temperature. Then remove the cakes and cupcakes from the pans and allow to cool completely.

The great thing is, that even if you leave these cakes out overnight or during the day, even just loosely wrapped in saran wrap, they are STILL crazy moist and delicious. So don’t worry if you can’t do it all at once, you will still have a scrumptious cake.

Ok, on to the, literally, frosting on the cake…

This one’s real complicated, so pay close attention…

Put the powdered sugar, cream cheese, butter, vanilla, lemon zest (and lemon juice if you like a little extra tang) into a large bowl or a stand mixer bowl. Mix them up until smooth and creamy. Then spread this yummy frosting on your cake or cupcakes, or whatever you well please.

Heaven, is that you?

I think you can probably take it from here, but just in case you weren’t convinced, yet:

that’s YOUR slice…

..this one’s MINE…

Happy Baking! Hope you enjoy!

Posted in Cake, Desserts, recipes | 2 Comments

Tomato-Lentil Love…or Fireworks of Deliciousness?

So, I used to be that girl who resisted lentils based solely on my dad’s attempts to get me to eat split-pea soup as a child. I now know two things: that split peas and lentils are NOT the same thing, although certainly related in the world of legumes AND that lentils are delicious AND nutritious.

If you have felt resistance to lentils in the past, rational or irrational, this recipe is probably a great one to start with. Because, well, if I were to characterize this soup in terms of flavor, I would call it more of a robust roasted tomato stew over a lentil soup. But the lentils, in this case green, provide an important depth to the flavor and certainly take this soup from ‘pretty good for you’ to ‘way good and very satisfying.’

I guess the original recipe is from the Barefoot Contessa at home cookbook, and where we found it was on Smittenkitchen.com, an absolutely delightful food blog with lots of tasty treats worth trying. Not much has changed, except for a few recommendations of toppings!

For the Stew:

2 teaspoons olive oil

2 cups large-diced yellow onions (or two onions, generally)

2 cups large-diced carrots (3-4 carrots)

1 tablespoon minced garlic (3 cloves)

1 28-oz can whole plum tomatoes

1 cup green lentils

2 cups vegetable or chicken broth

Spice mix:

2 teaspoons curry powder

2 teaspoons fresh thyme (or dried, we used dried, heathens that we are)

2 teaspoons kosher salt

1/4 freshly ground pepper

Added just after cooking:

1 tablespoon red wine vinigar

To the Stew!

First things first, you’ll want to prep your veggies, un-can your tomatoes into a food processor or large bowl, and rinse and pick through your lentils.

Heat a large saucepan. I almost wrote ‘heat oil’ in a large sauce plan, but I just learned from my mom the other day  that you actually aren’t supposed to heat the oil while heating the pan. I guess it affects the way the pan heats up and brings the oil to its burning point faster, which could affect your flavors.

Oh my god, what is this blog doing to me?? I’m supposed to be ‘rough-chop’ not ‘Suzy-perfect-pants’!!! Ayyyeee!!!

Anyhow, ahem, once the pan is heated up, add the oil, wait until it ‘shimmers,’ then add the onions and carrots and saute over medium-low heat for 8-10 minutes. You want to brown the onions slightly, and soften up those carrots.

While the carrots and onions are browning, mash up those tomatoes, either in a food processor, or in a bowl. You could probably also skip this step by buying a can of mashed or chunked Roma (or plum) tomatoes.

For the spice mix, I find it kind of nice to measure these things into a prep bowl then toss ’em in when it’s time. So, just measure out your curry powder (we just used regular ol’ curry powder), thyme (dried OR fresh), salt and pepper.

Now it’s time to add it all in. Pour in the pureed tomatoes, lentils, chicken or veggie broth and your spice mix.

Bring everything to a boil, then lower the heat back to a simmer. Cook for 40 minutes, or until the lentils are tender. Remove from heat, let sit for 10 minutes (we sort of didn’t do this, but it was STILL really good). Stir in 1 tablespoon of the red wine vinegar and you are ready to go!

..that is pure goodness happening in there…

This soup packs a LOT of flavor and will leave your taste buds begging for more. Not something you might expect from a ‘lentil’ stew, but it is seriously like fireworks of deliciousness going off in your mouth. And it will also leave you feeling satisfied and like you’ve eaten something really wholesome and healthy.

Unless:

If you are inclined towards things of the dairy variety, I highly recommend Parmesan cheese freshly grated over top. Or another great addition is some heavy cream, just if you didn’t feel like you reached your fat quota for the day. Just stir a tablespoon or so in just before you eat.

YUM.

Wowza. It’s a good one. Thanks for reading, and hope you enjoyed!

Posted in Beans, recipes, Side dishes, Soups, vegetables | Leave a comment

She’s My Berry Pie!..

She’s my berry pie,
Cool drink of water, such a sweet surprise.
Tastes so good, make a grown man cry,
Sweet berry pieeeeeeeee!!!

Warning: do not attempt to eat this pie through the screen. It’s really easy to make, and not worth the clean-up or potential damage to your computer.

Come on, who doesn’t like to sing a little Poison (You go, 80s children everywhere!) every now and then? After eating this Berry pie, you’ll want to shout it on a mountain top!

So, Berry pie: another elusive item on my recipe list, along with bread, ice cream (until recently!) and baba ganoush (how do you get it smoky and not bitter??). But I can officially move the Berry Pie onto to the ‘can-do’ list. I guess what prompted the whole thing was making a cherry pie a couple weeks ago for an uncle’s birthday. Special Request! I had never made a cherry pie before and many of the recipes called for sour cherries. However in Spokane at this time there was literally one grocery store that had cherries at all, they were frozen and dark, sweet cherries.

The recipe I loosely based my recipe on was from epicurious and the crust is the best I’ve every made. I highly recommend it and use it below for the crust in this pie. However, the directions for the cherry filling were a little disappointing and ended up more of a cherry soup than a cherry filling. The pie was still delicious and I have never before thought of cinnamon being coupled with cherries, but it was delightful and added depth to the flavor.

Ok, I shouldn’t be too hard on you, pie, you look pretty yummy, too!

The Red Sea of Cherry! Although the recipe called for both cornstarch and tapioca, I don’t think there was nearly enough of either. But more importantly, it did not recommend that you thaw the berries first. I think whenever making a pie with frozen fruit it is very important to drain out the extra water being retained in the fruits, otherwise there will be too much liquid to deal with!

SO, enough about the pie that didn’t work, let’s get on to the best berry pie recipe, the only one that you’ll ever need! This pie has a flaky and buttery crust (I never promised not use fat! Only few ingredients and this one totally complies with that!) and a tart and sweet center. The filling is firm, yet still very moist. You won’t have any slices degrading into a sea of fruit filling. These slices stand up with the integrity of their own flavor…and a little corn starch!

Note on the pie filling: We used a combo, three packs of frozen and a couple containers of fresh raspberries and blueberries, but I’m sure whatever you choose will be yummy! I think even adding one container of fresh berries adds some freshness to the frozen ones if you don’t or can’t get all fresh.

For the Filling:

5 cups of frozen or fresh fruit, thaw if frozen

3 tablespoons cornstarch

2/3 cup sugar

1 tablespoon lemon juice

1 tablespoon lemon zest

For the Crust:

2 and 1/2 cups all-purpose flour

1 and 1/2 sticks cold unsalted butter, cut into 1/2 inch cubes

1/4 cup cold vegetable shortening

1/2 teaspoon salt

5-7 tablespoon ice water

1 tablespoon sugar

For the Glaze:

heavy cream

sugar

On to the pie!!

Before everything else and only if you are using frozen berries: take them out now and place them in a colander or sieve over another bowl. You might even want to give them a rinse or two under some tepid water, just to help the defrosting along.

Let’s start off with your crust, since you’ll need to refrigerate it for at least an hour before rolling out. Get out a glass and throw in some ice and water, so it’s nicely chilled before you add it to your crust.

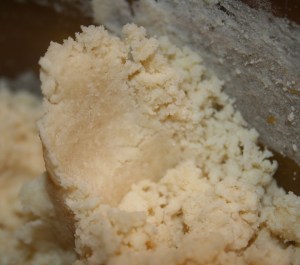
Mix the flour, butter, shortening, sugar and salt in a bowl with a pastry blender, a fork, or in a food processor until it looks like course sand.

Although the epicurious recipe also says you can use your fingers, I think this should be avoided. I don’t know much, but since you bothered to keep the butter and shortening cold, I think using your fingers might warm it up too quickly, thereby affecting the way the flours and fats get coated in each other. I believe those little pockets of fat are what you WANT, so you don’t want it to blend too finely. You want it to look roughly like this:

Next, sprinkle the flour/fat mixture with 5 tablespoons of ice water evenly over the dough. And hark, here is a rare instance of my being anal-retentive about cooking, but if you are using the food processor, I even out the dough mixture inside using a spatula. For some reason it bothers me when it all goes into the center depression in there…from the centrifugal force of spinning. Centrifugal literally means to ‘flee the center’ in Latin, so don’t let those little flour covered bits of fat evade your water!

Ok, moving on. If you do a couple pulses and the dough is still looking more like sand than dough, you can sprinkle in a couple more. Sometimes I use 5, sometimes 7, you just have to pay attention to the consistency. This is just one of those mysteries of the Universe that depends on the alignment of the planets or solar flares or something.

But if you press some of the bits together, you want them to stick together, not fall back apart, and certainly you don’t want them to make a squishy SOUND. That’s rude.
“I said stand UP when you are squished, dough!”

Now place your dough onto a work surface, I just use a cutting board, no additional flour. And in the recipe they go into a whole process of dividing into 8 pieces, etc., etc. I just break it up into a few handful sized pieces and smear them onto the surface. I guess this does something for the fat dispersal. I haven’t tried it without this step, but I just don’t think it’s that important to get too sidetracked into it. You just want to squish things around a bit, scrape ’em up with a pastry scraper or large metal spatula and form them into two disks. These you will cover with plastic wrap and place in the fridge for at least an hour. I think this again harkens back to the fact that you don’t want to butter and shortening to melt before they are in the oven – that’s what gives you your flakes of crust!

You are going to be so beautiful when you bake up…

So, now that the dough is chillin’ we are (hopefully and depending on the frozen/thawed state of your berries) ready to move on to the berry mixture. Which could not be easier or less complicated.

The filling for this pie is loosely based on this one from www.joyofbaking.com.

In a small bowl, combine the sugar, cornstarch, lemon juice and lemon zest. Move the defrosted or fresh berries to a large bowl and sprinkle with the mixture. Gently toss together, although if the berries are frozen and thawed, there is a certain gloopiness that can’t be avoided! Fear not, it will TASTE delicious in the pie, even if it doesn’t look pretty now.

they still look preeeeetty pretty….

Set aside the mixture, because now it’s time to roll out the dough! This would also be a good time to preheat the oven to 425 degrees F. I place a cookie sheet either directly on the shelf I’m using (middle position) or just beneath to catch any errant juices that escape..it saves loads of clean-up!

Leave whichever round you aren’t rolling out in the fridge so it stays cold. Get out your pie dish and rolling pin. My pie rounds NEVER look pretty, but I am always sure not to let them stay too thick, since you want it to cook all the way through AND the excess just gets wrapped up in the very edge of the crust, which means more brown crusty bits to ‘taste test.’

Some tricks you can use if you’ve had crusts rip in the past is you line both sides with parchment paper or saran wrap, then you can move it easily and not dirty the roller! So, roll it as roundly as you can, then either fold into fourths, or in half and gently lift into the pie dish. Push the corners down and stretch the dough gently over the edges so it hangs a bit. Place it back in the fridge until the second is rolled out. I just did a plain ol’ fully covered dough, because A) I like dough and B) I don’t like making lattice-work dough tops. Why would a sacrifice all that delicious crust just so I can see the inside of the pie???

So, once the dough is all rolled out, pour in the filling.

Gently lay your second dough round on top, stretching slightly over the edges. Squeeze the dough that overlaps at the edges together, and generally fold any excess dough under and press together to achieve an even-ish edge. Some people would tell you to cut it off perfectly about an inch over the edge and roll under. Not me. I tell you that I wouldn’t give away those extra bits of brown crusty dough for the world.

The only thing you should be sure of is that the dough still hangs over the edge a bit. This helps the dough grip to the edge of the pie dish so it won’t shrink on you!

This is also the time to get fancy with your fluting if you are feelin’ it. I just used a fork this last pie, but you can use whatever. Think of something fun to use that will make an interesting pattern. The time before I used a hard plastic straw.

Using a sharp knife, cut some vent holes in the top, slits, stars, hearts, whatever you want.

Ok, we are getting down the final moments of this glorious pie bake. Next you’ll want to get the heavy cream and maybe a tablespoon or so of sugar. Brush on the heavy cream, then sprinkle a light dusting of sugar.

Bake at 425 degree F for 1/2 an hour. The edges of the crust should brown nicely during this part, but keep an eye on them just in case they are browning more quickly. For the second half of the baking process you will be using either one of those pre-made crust protectors or just some foil strips that I usually pre-shape for greater ease in putting it on, the pie IS hot!

So, after the first half an hour, turn the oven down to 375 degrees F and let bake an additional 30 minutes, with the foil crust protectors – I recommend removing the pie from the oven to put these on, but that’s just because I don’t like getting burned.

Oh, man. I am getting excited about your pie…can you spare a piece?? I’m not allowed to make it for another couple weeks, since we clearly have no self control around it.

So here we are, your pie is done, you’ve pulled it out of the oven and placed it on a cooling rack to let it cool for several hours. That’s right, SEVERAL hours. I know it hurts. I know you want it NOW. But letting it finish setting up will be rewarded, my friend, and sweetly.

…just look at that golden, delicious crust…

So, I assure you that you’re waiting and efforts will be paid in full. Whether you couple your slice with vanilla ice cream, whipped cream or nothing at all, this pie totally delivers.

So go forth and enjoy pie! And maybe with our positive and forward thinking thoughts SPRING will finally arrive and give us the perfect weather in which to enjoy a delightful berry pie!!

Thanks for reading and happy pie making!
Posted in Desserts, Pie, recipes | Leave a comment

A Tale of Two: The Red Wine and Pear Sorbet….

Many years later, as (s)he faced the firing squad, (elisabeth) Colonial Aureliano Buendia was to remember that distant afternoon when (her) his father took him to discover ice (cream)…

….and it was good…


So, if you’ve read One Hundred Years of Solitude by Gabriel Garcia Marquez, you may have noticed some slight changes to the above quotation. However, it was the first thing that popped into my mind when thinking about making my own sorbet and ice cream. The feeling of that total mystery of ice, or in this case, ice cream, even when it is sitting right in front of you. It has always seemed like a far off, distant sort of dream, balancing the flavors, getting the texture just right. Of course, first things first, you need a strong arm and plenty of time or an ice cream maker, the latter of which I did not possess until last week (Thanks, mom!).

And after a weekend of ice cream making, well, I  can assuredly say that only the tip of the ice (cream) berg has been revealed.

I saw this recipe for Red Wine and Pear sorbet in the New York Times online, and even before I had or knew I would have an ice cream maker, I posted on facebook that this would be my first recipe on that far off, eventual day. And through a lucky twist of fate, here I am, one week later and in possession of one red and beautiful ice cream maker (and five kinds of ice cream in my freezer)!

Let me also point out that this sorbet is packed with phytonutrients, and SO, it’s sort of like taking your vitamins….

So, let’s get TO it. Here’s what you’ll need:

2 and 1/2 lbs of ripe pears (4-6 large pears, we used Barletts)

1/2 cup sugar

1 and 1/2 cups water

1 and 1/2 cups red wine (I used a red blend)

1 2-to 3-inch cinnamon stick

1/2 teaspoon vanilla extract

pinch of freshly ground pepper

2 tablespoons fresh lemon juice

First, you’ll want to prep the pears. I just used a peeler, slicing the top and bottom parts of the pears as close to the edge as possible.

The peels make great snacks for pups if you have them, or yourself!

I don’t know, maybe it’s just me, but I totally have this thing about creating stonehenge out of random, stonehengy shaped things….

Pearhenge…what does it MEAN???

So, now that we have THAT out of the way, we can continue to the next step….which is basically to measure out the other stuff, but not the LEMON juice or the pepper, we’re saving that for later… (red wine, water, sugar, vanilla, cinnamon stick) and put it all into a medium pot on the stove.

wine bath, anyone?

Bring to a boil, then reduce to a simmer, uncovered until the pears are soft and translucent. The recipe from NYT says it will take about 30 minutes, but I guess our pears were a little on the harder side, because it took about 45 minutes. But not to worry, I think the greater importance is getting the pears soft and wine infused over a particular amount of time. I also sort of tended to the pears, turning them over and putting the ones on top underneath after a bit. Believe me, you’ll WANT to be near the pears, because they give off a delightful scent that is reminiscent of mulled wine and holidays.

When the pears are ready, they will have a beautiful deep reddish purple tint. Remove them carefully, especially if they are soft!, and place into a bowl to cool a bit.

Toss your pinch of pepper into the syrup remaining in the pot and remove the cinnamon stick. You want this syrup to be thin, but still syrupy. If you tip your pot sideways, then back down, you want a thin layer of the liquid to remain on the side. The syrup may already be about that consistency, in which case you don’t have to cook it further. I would say I continued to reduce for a few more minutes after removing the pears.

Then you’ll want to blend the pears. I used the food processor, because we all know my burny history with hot things in blenders. Blend at your own risk, and if the pears aren’t pretty darn cool by the time you are putting them in the blender, SMALL BATCHES! Aye!

Blend, blend, blend, until the pears get nice and smooth, then slowly add your syrup. Next, add the lemon juice, and blend some mo.’

Transfer the mixture into a bowl, or in my case a REALLY large measuring cup. This makes it really easy to pour into your ice cream maker. Place whatever you plan to store this in into the freezer so it gets nice and cold.

When you are ready to make the magic happen, and not a minute before, get out your frozen ice cream making component and get ready to pour! You do want to have given your mixture plenty of time to cool, because the cooler it is, the more efficient your ice cream maker can be!

At first, it will have the consistency of a thick soup. But slowly, over the next 25-30 minutes of work by your little ice cream maker,

it will look more like THIS:

And now it’s time to transfer to your chilled container, where you can make it look pretty, like the ice cream containers inside the glass at ice cream shops:

Just use the back of a spoon, and pretend you are icing a cake..

And now you’ve done it! This is a great little ice cream maker, that isn’t too expensive. And furthermore, you will NEVER be held back by the limited number of ‘regular’ flavors of ice cream and sorbet at the store! You can make any flavor your little heart desires..which reminds me, check back soon for the recipes for basil, pistachio, classic vanilla bean aaannnndd lavender!!

For now, hope you enjoy! Now it’s back to the ice cream making cave!!!

Posted in Desserts, Ice Creams and Sorbets, recipes | 1 Comment